
Les 649
We are going to make this

This tutorial is an idea from Yaele.
Thank you Yaele
This has been processed and translated on the site by Carin
What do you need:
Material: ![]()
Plugin: Screenworks ![]()
Group watermark.
Psp
As

Take the ruler along to use as your indicator
1
File new 500x500.
Fill with #c0c0c0.
Layers/New rasterlayer.
Fill with Black.
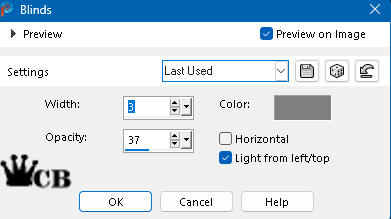
Effects/3d effects/Texture effects/ Blinds
2
Copy and paste as new layer Tubed by Monique42_1100.psp.
Image/Mirror/Mirror Horizontal.
Slide it to the left see example.
Adjust/Hue ans Saturation/Colorize 0/0.
Adjust/Blur/Blur.
3
Effects/Plugin/Screenworks/Grid layout.
Opacity 40%.
Background color black.
Close foreground color.
Make your black layer actief.
Grap your pen tool Draw a rextangle the size of the tube.

Close (gray) the bottom layer.
Layers/Merge/Merge visible.
4
Open the tube Tubed by Monique42_1100.psp again.
Delete the other layers of the tube.
Image/resize 60 % check all layers.
Layers/New rasterlayer.
Fill with Black.
Layers/Arrange/ move down.
5
Image/Add borders 5 color #C0C0C0.
Magic wand select the border.
Selections/Invert.
Effects/3d effects/Cutout
Selections/Select none.
Copy and paste as new layer on your main work.
Slide it on place see example.
6
Layers/New rasterlayer.
Tool brush find Regard dreams size 225 foreground color #E75003.
Stamp with your brush the text see example.
Font Tarzan size 72 type your name.
Place the text below the frame see example.
Layers/convert to raster layer.
7
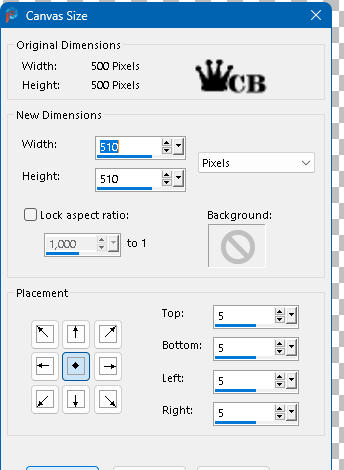
Image/Canvas size.
Make the merge layer active.
Select the transparent border and fill in with #c0c0c0.
Selections/Select none.
8
Top layer active.
Set the background color on #c0c0c0.
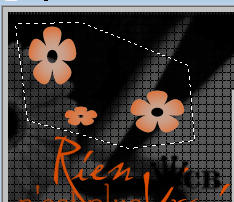
Find flower 2 in the Preset shape Tool (is a standart shape tool).
Make 3 times 3 flowers in different size (see example).
Layers/Convert to raster layer.
Selections/Select all.
Selections/Float.
Make the merge layer active 1x delete.
Selections/Select none.
Delete the top layer.
Merge layer active.
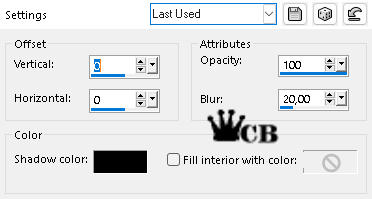
Effects/3D effects/Drop Shadow 1/1/100 / 30.00 / color #E75003.
9
Make de bottom layer open and active.
Grap your freehand selection tool and select the 3 flowers on the top left.
Fill the selection with #F18622.
Selection/select none.
10
Stay at the bottom layer.
Select the 3 flowers at the bottom left.
Fill the selection with #202020.
Selection/select none.
11
Edit /Copy special/Copy merged.
Go to As and paste as new animation.
Back to Psp.
12
Bottom layer active and fill in wih #c0c0c0.
Grap your freehand selection tool and select the 3 flowers on the top right.
Fill the selection with #f18622.
Selection/select none.
13
Stay at the bottom layer.
Select the 3 flowers at the top left.
Fill the selection with #202020.
Selection/select none.
14
Edit /Copy special/Copy merged.
Go to As and paste after current frame..
Back to Psp.
15
Bottom layer active and fill in wih #c0c0c0.
Grap your freehand selection tool and select the 3 flowers on the bottom left.
Fill the selection with #f18622.
Selection/select none.
16
Grap your freehand selection tool and select the 3 flowers on the top right.
Fill the selection with #202020.
Selection/select none.
17
Edit /Copy special/Copy merged.
Go to As and paste after current frame.
18
Edit/Select all.
Animation/frame properties 30.
19
Add your group watermark .
Save your work as Elina.gif
Mind the proper settings when you save your work, please check this (see tips.)
![]()
20
Send in your Animation.
In the subject line place the name of your moderator, the lesson number, and your name.
I hope you've enjoyed this tutorial.
@Carin
Translated 09-05-2023
*******************************************************************************************
@Carin-psp-creaties.
If my classes seem to be other than original, this is a coincidence.
All the tutorials have been invented by me and written by me.
None of my lessons may be published as your own work.
This also applies to the materials used for the lesson.
Leave the file names and watermarks of the makers of the tubes intact.
* * Respect each other's work * *