
Les 621
We are going to make this
This tutorial is an idea from Crea Annie.
Thank you Crea Annie
This has been processed and translated on the site by Carin
What do you need:
Material: ![]()
Plugin: Unlimited ![]()
Group watermark.
Psp
As

Take the ruler along to use as your indicator
1
File new 300x350.
Foreground color #aba7a4.
Background color #825b5c.
2
Make a gradient lineair.
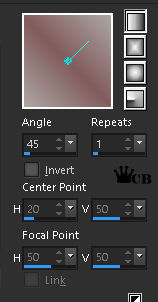
Fill your working sheet with gradient.
3
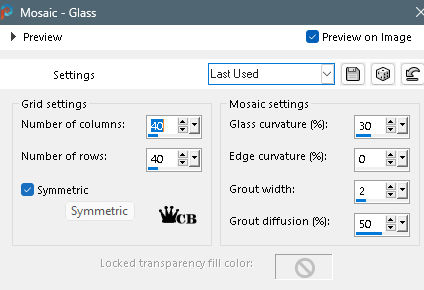
Effects/Texture effects/Mosaic glass.
4
Copy and paste as new layer the tube 915-luzcristina.pspimage.
Image - resize - 90% - all layers NOT checked.
Adjust - sharpness - sharpener.
5
Image - add borders - 1 pix foreground color.
Image - add borders - 3 pix background color.
Image - add borders - 1 pix foreground color.
Image - resize - 80% - all layers checked.
6
Image - add borders - background color - symmetric off.
7
Click with your magic wand in your solid color.
Layers - new raster layer.
Set your foreground to color and fill your layer.
8
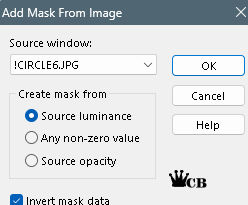
Layers - new mask layer - from image.
Layers - Merge - Merge Group.
9
Selections - invert.
Effects - 3d effects - drop shadow vert 3 hor 3 opacity 60 blur 12 black.
Repeat drop shadow -3 -3-60-12 black.
Selections - select none.
10
Copy and paste as new layer the tube Tubed_by_Monique42_F819.pspimage.
Image - resize - 80 % - all layers NOT checked.
Move right center.
11
Copy and paste as new layer the tube diamanten.psp.
Move to the top right.
Set your blend mode to soft light.
Layers - new raster layer - put your groupwatermark.
12
Find a nice font - stroke width at 0.
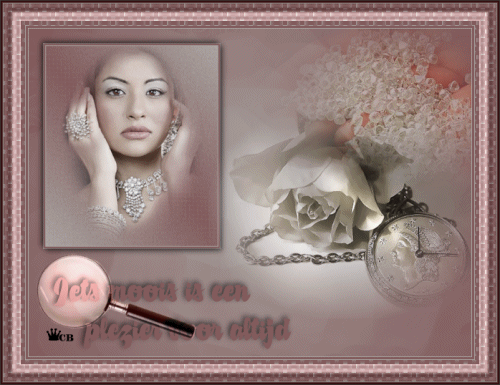
Type: Iets moois is een
plezier voor altijd.
Move to the bottom left.
Effects - 3d effects - drop shadow - settings is ok.
13
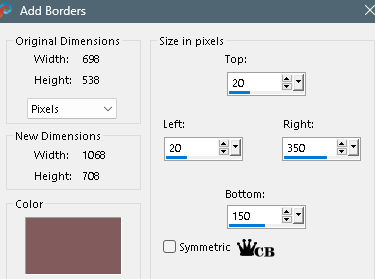
Image - add borders - 1 pix foreground color - check symmetrical.
Image - add borders - 3 pix background color.
Image - add borders - 1 pix foreground color.
Image - add borders - 30 pix background color.
14
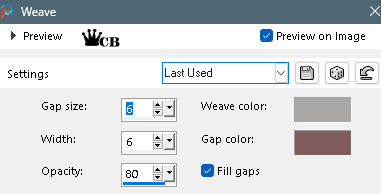
Select your border with your magic wand.
Effects - Texture Effects - Weave Pattern.
15
Image - add borders - 1 pix foreground color.
Image - add borders - 3 pix background color.
Image - add borders - 1 pix foreground color.
16
Selections - select all.
Selections - modify - contract : 40.
Selections - invert.
Effects - plugin - unlimited 2 - buttons&frames.
Selections - select none.
17
Copy and paste as new layer the tube loep.psp.
Image - rotate - free rotate left 45.
Set your blend mode to overlay.
Move your loupe on the first word.
18
Edit - Copy Merged.
To animation shop.
Edit/paste as new animation.
19
Back to psp.
Effects/Image Effects/Offset/ Horizontal offset: 50 Vertical offset: 0 check mark Custom and Transparent.
Edit - Copy Merged.
To animation shop.
Edit/paste after current frame.
20
Repeat step 19 until you have 6 frames.
21
Back to psp.
Now put your magnifying glass on the beginning of word 2nd line (will come in edge).
Edit - Copy Merged.
To animation shop.
Edit/paste after current frame.
22
Back to psp.
Effects/Image Effects/Offset/ Horizontal offset: 50 Vertical offset: 0 check mark Custom and Transparent.
Edit - Copy Merged.
To animation shop.
Edit/paste after current frame.
23
Repeat step 22 until you have in total 13 frames.
24
Back to psp.
Close your top layer and select your bottom layer.
Edit - copy.
To animation shop.
Edit/paste after current frame.
25
Select your first frame.
Edit - select all.
Animations - property for frame - 50.
Now select your last frame.
Animations - frame property - 100.
26
Select your first frame again.
Edit - select all.
Animation - resize - 500 pix - longest side.
27
Save your work as .gif.
Mind the proper settings when you save your work, please check this (see tips.)
![]()
28
Send in your Animation.
In the subject line place the name of your moderator, the lesson number, and your name.
I hope you've enjoyed this tutorial.
@Carin
Translated
07-10-2022
*******************************************************************************************
@Carin-psp-creaties.
If my classes seem to be other than original, this is a coincidence.
All the tutorials have been invented by me and written by me.
None of my lessons may be published as your own work.
This also applies to the materials used for the lesson.
Leave the file names and watermarks of the makers of the tubes intact.
* * Respect each other's work * *